
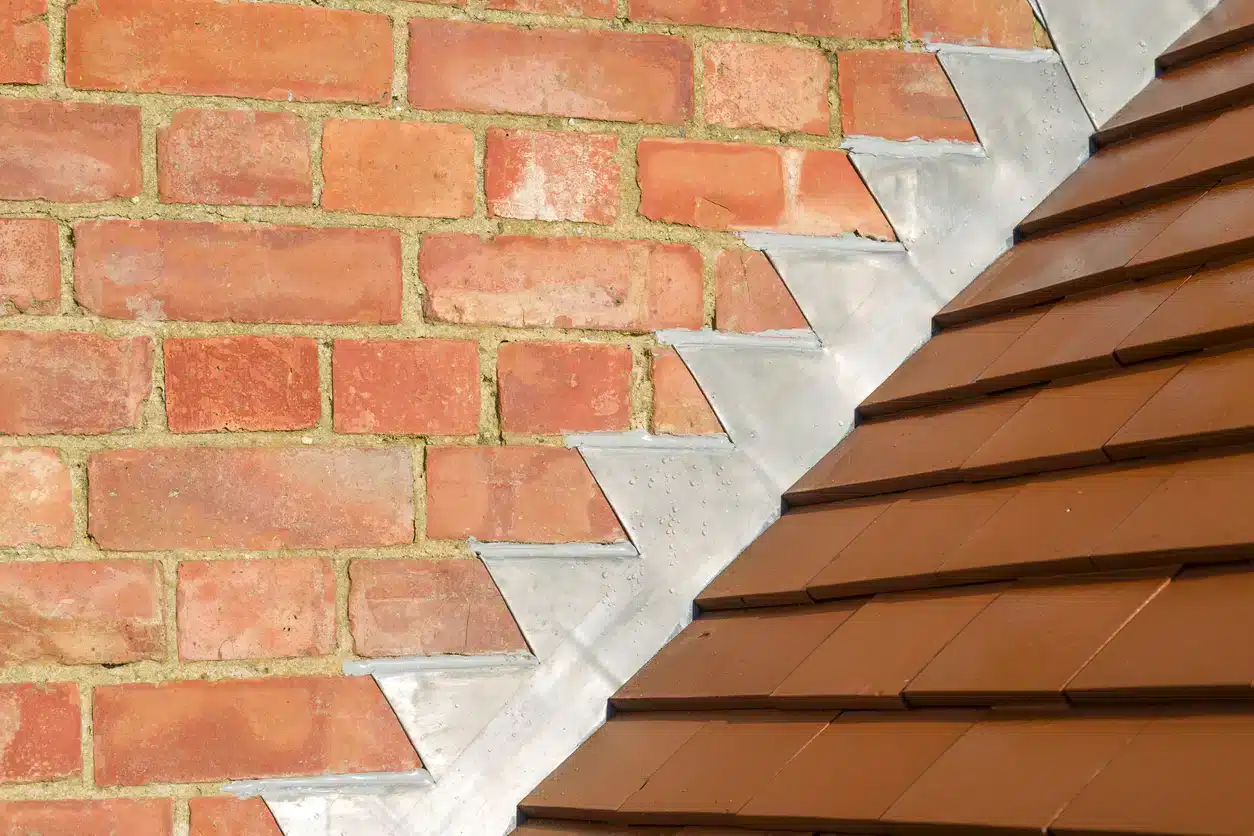
At a Glance: Step flashing is a set of individual L-shaped metal pieces layered in with your shingles wherever the roof meets a wall or chimney. Its job is to channel water off the roof and keep it from slipping behind the siding or masonry, and you will find it along sidewalls, chimney bases, and dormers. It comes in several materials, including aluminum, galvanized steel, copper, and color-matched metal, and the material itself is cheap, with a bundle of aluminum running about $20 to $50 and copper costing several times more. The biggest risk is not the price but poor installation, which leads to water leaks and hidden rot. That is the whole point to remember here: the metal is inexpensive, and the skill to install it correctly is what actually protects your home.
What Is Step Flashing?
Step flashing is a series of individual L-shaped metal pieces installed between shingle courses where a sloped roof meets a vertical wall. Each piece overlaps the next to create a layered path that directs water down and away from the wall instead of letting it slip behind the siding.
Because the flashing is staggered with the shingles, rainwater sheds across the roof surface instead of working behind the siding. This layered installation helps protect one of the roof’s most leak-prone areas.
What Is Step Flashing Used For?
The main job of step flashing is leak prevention, where the roof meets another structure. These transition points are among the most common sources of moisture intrusion, especially during heavy rain or wind-driven rain. You will typically find it in three areas:
- Vertical walls: Where the edge of the roof meets siding, sidewall flashing keeps water from seeping behind the exterior wall covering.
- Chimneys: Along the sides of a chimney, it stops water from pooling at the base or slipping through gaps in the masonry.
- Dormers: These small roof extensions need extra protection where their sides meet the main roof slope. Roof-to-wall joints on additions, where two sections of a home meet, are another common spot.
Each of these areas sees constant runoff, so missing or damaged flashing can lead to water damage, wood rot, or mold over time.
Step Flashing Details
For step flashing to work, the installation details matter.
- Size and materials: Pieces are usually bent from aluminum or galvanized steel. Copper step flashing is used for copper or slate roofs. A common size is about 5 inches by 7 inches, though the right dimension depends on roof slope and shingle type.
- Overlap: Each new piece should overlap the one below it by at least two inches. This creates a cascade so water always lands on top of the next piece, not behind it.
- Integration with shingles: A roofer lays a course of shingles, sets a piece of flashing against the wall, then lays the next course over it. You should only see a small part of each piece peeking out. Home inspector standards from groups like InterNACHI treat this layering as a non-negotiable mark of proper installation.
Pro Tip: Best practice is one roofing nail per piece, placed near the top corner where the next shingle and the siding will cover it. Extra nail holes lower down create paths for water.

Step Flashing Materials and Options
You have choices for flashing material, just like you do for shingles. The right pick depends on your budget, roof type, and the look you want.
Material | Best For | Notes |
|---|---|---|
Aluminum step flashing | Most asphalt shingle roofs | Lightweight, low cost, easy to cut on-site. Can corrode where it touches mortar or treated wood. |
Copper | Copper or slate roofs, historic homes | Long-lasting, can outlive the shingles, develops a patina. Higher upfront cost. |
Color-matched metal | Blending with shingles or trim | Painted aluminum or steel. The paint adds protection but can fade over many years. |
Galvanized steel | Budget projects needing more strength | Zinc coating resists rust. A bit stronger than aluminum. |
A Note on “Shingle Step Flashing”
You may hear about using cut shingles or tar in place of metal. This is not an acceptable practice. Proper step flashing uses interlocking metal pieces. Roofing cement or shingles shaped to mimic flashing will crack, dry out, and fail fast, leaving your home open to water damage. If a roofing contractor suggests this, treat it as a major red flag.
Step Flashing on Chimneys
Chimneys are one of the most leak-prone spots on any roof. The joint where brick or stone meets the shingles naturally collects water. Step flashing forms the first line of defense, redirecting water away from the chimney base before it reaches the masonry or roof deck.
The terms “step flashing chimney” and “chimney step flashing” mean the same thing: small L-shaped pieces along the chimney sides, each overlapping the next in a stepped pattern. This layering adapts to uneven surfaces better than continuous flashing and keeps water from getting behind the metal.
Step Flashing vs. Counter Flashing
Proper chimney waterproofing uses two layers that work together but do different jobs.
- Step flashing goes in first, woven with the shingles and running up the chimney brick. It catches water off the roof and keeps it on top of the shingles, away from the roof deck.
- Counter flashing is the cap. It sits in a mortar joint of the chimney and folds down over the top edge of the step flashing, sealing it from rain running down the chimney face.
Think of it this way: step flashing protects the roof deck, and counter flashing protects the step flashing. Used together, they form a complete seal. The Chimney Safety Institute of America points to this two-part system as the professional standard.
For upscale or historic homes, many owners choose copper for both layers. Copper resists corrosion, holds up for decades, and ages into a patina that suits traditional architecture.
Common Step Flashing Problems
The most common step flashing failures are poor installation, rust and corrosion from the wrong material, and missing kickout diverters at the bottom of roof-to-wall transitions. In Atlanta’s humid, storm-prone climate, any of these can lead to hidden water damage, wood rot, and mold.

Poor Installation
This is the number one cause of failure. One red flag is nails driven through the face of the flashing. Another is a single long piece (called L-flashing) used in place of individual steps. That single strip cannot expand and contract with temperature swings, so it warps and pulls away from the wall, breaking the seal.
Rust and Corrosion
The wrong material fails even when installed well. Lower-grade galvanized steel can rust, and standard aluminum can corrode against the alkaline chemicals in brick mortar. Once corrosion starts, tiny pinholes let water seep through during a heavy downpour, causing slow leaks that damage the roof deck and attic before you notice.
Missing Kickouts
A kickout is a small formed piece at the bottom of a roof-to-wall line that pushes water out and away from the wall, usually into a gutter. Without it, water runs behind the siding, which leads to wood rot, mold, and even termites. A missing kickout is a sign of an incomplete job and can mean thousands of dollars in siding and structural repairs.
Cost, Sizes, and Buying
The material price is a small fraction of the value. The real investment is the skill to install it correctly.
Pricing
- Standard aluminum is sold in bundles. A pack of 25 or 50 pre-bent pieces runs about $20 to $50, depending on thickness and size.
- Copper is sold by the piece or in smaller quantities and costs several times more. Its price moves with the metals market.
Sizes
There is no single universal size, but common standards fit most asphalt shingle roofs. A typical piece is around 5 inches by 7 inches. The goal is enough metal to run at least 4 inches up the vertical wall and 4 inches onto the roof surface so the shingle fully covers it. Steeper roofs may need larger pieces.
Where to Buy
For a small repair, you can find basic step flashing at big-box hardware stores around Atlanta. Professional roofing contractors usually buy from dedicated roofing supply houses, which carry a wider range of gauges, colors, and higher-grade metals than the general public can find.
Pro Tip: An online step flashing calculator only gives a rough material estimate. It cannot account for corner cuts, chimney counter flashing, or the final kickout piece. As a rule of thumb, you need one piece of flashing for each course of shingles.
Why Professional Installation Pays Off
A $30 bundle of aluminum, if nailed in the wrong place or layered poorly, can lead to thousands of dollars in water damage, rot, and mold. Hiring a professional means paying for the experience to integrate flashing with your roof, handle tricky angles, and make the system watertight. That is the difference between a quick patch and a permanent fix, especially on a new roof you plan to keep for decades.
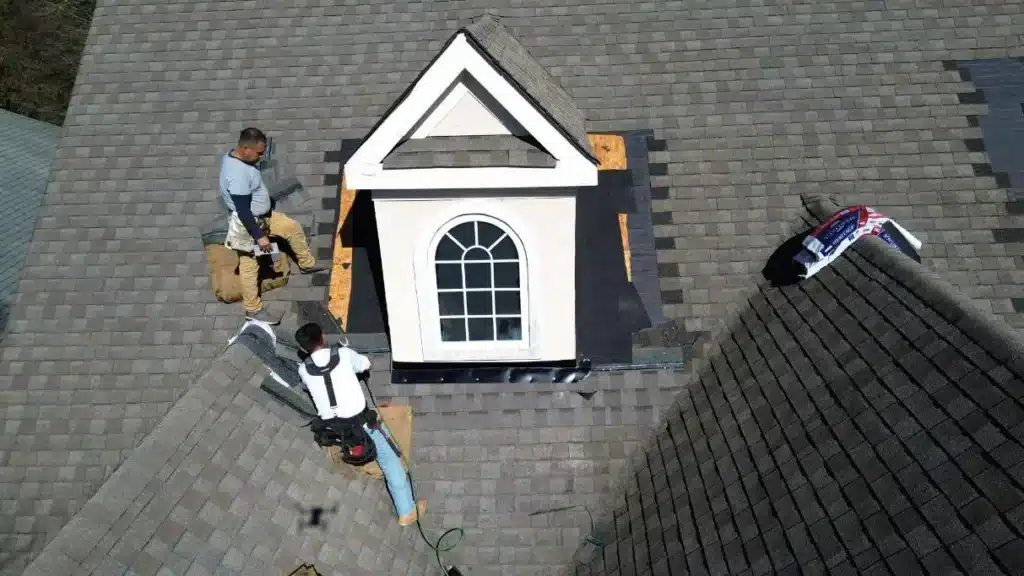
Trust Mr. Roofer of Atlanta With Step Flashing
Step flashing may not be the most visible part of your roof, but it protects some of its most leak-prone areas, including roof-to-wall intersections, dormers, and chimneys. Proper installation helps direct water away from those joints and prevents leaks, mold, and hidden water damage.
If you suspect a flashing problem or want peace of mind before the next heavy rain, contact Mr. Roofer of Atlanta. Our team provides step flashing installation and roof leak repair for homeowners in Marietta, Alpharetta, Cartersville, Sandy Springs, and throughout metro Atlanta.